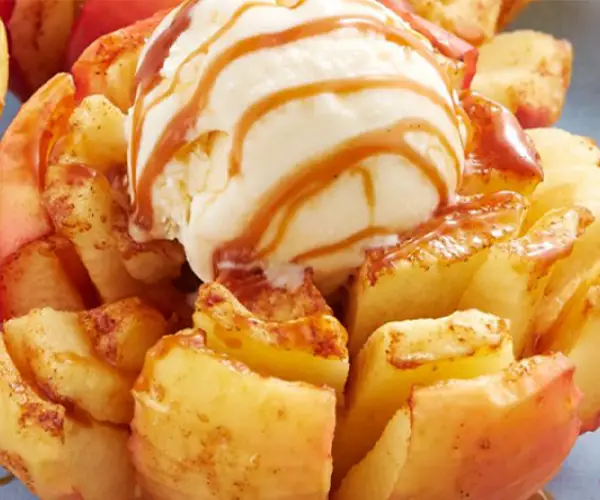
Oven-Baked Bloomin’ Apples are a delightful twist on the classic blooming onion, transformed into a sweet, baked treat. These apples are cored, cut into a flower shape, and then baked until tender. Typically filled with sweet, flavorful ingredients like cinnamon, sugar, and butter, they offer a unique and eye-catching dessert option. Ideal for special occasions or as a warm, comforting treat, these apples are easy to make and sure to impress.
Pairing Suggestions with Bloomin’ Apples
- Vanilla Ice Cream: A classic choice, vanilla ice cream complements the warm spices of the bloomin’ apples, adding a creamy texture and cool contrast.
- Caramel Sauce: Drizzling caramel sauce over the baked apples enhances their natural sweetness and adds a luxurious touch.
- Whipped Cream: Light and fluffy, whipped cream pairs beautifully with the soft, baked texture of the apples.
- Nut Toppings: Sprinkle chopped pecans, walnuts, or almonds for a crunchy contrast and a nutty flavor that pairs well with the sweetness of the apples.
- Cheese Pairing: For a savory twist, serve with a slice of sharp cheddar cheese. The contrast between the sweet apple and the tangy cheese is delightful.
- Wine Pairing: A sweet white wine like Moscato or Riesling complements the dessert’s sweetness, while a glass of sparkling wine can add a festive touch.
- Coffee or Tea: A hot cup of coffee or a spiced tea like chai can be a comforting accompaniment, especially for a cozy evening dessert.
- Chocolate Shavings: For chocolate lovers, sprinkle some dark chocolate shavings over the warm apples for a decadent touch.
- Cinnamon Toasted Oats: Add a crunchy element with cinnamon toasted oats, which bring a pleasant texture and a hint of spice.
- Seasonal Fruits: Serve alongside fresh berries or sliced pears for a refreshing and lighter accompaniment that balances the rich flavors of the baked apples.
These pairing suggestions are designed to enhance the flavors of bloomin’ apples and provide a delightful taste experience, making them versatile for various occasions and preferences.
Storing and Preserving
-
Short-Term Storage:
- Refrigeration: Once cooled, place the bloomin’ apples in an airtight container. They can be stored in the refrigerator for up to 3-4 days.
- Reheating: To reheat, warm them in a preheated oven at 350°F (175°C) for about 10 minutes or until heated through. Microwave reheating is also possible but may slightly alter the texture.
-
Long-Term Storage:
- Freezing: Bloomin’ apples can be frozen, although this may slightly change their texture. To freeze, wrap each apple individually in plastic wrap and then place them in a freezer-safe bag. They can be stored in the freezer for up to 3 months.
- Thawing and Reheating: Thaw in the refrigerator overnight. Reheat in the oven as described above for the best texture.
-
Preserving Freshness:
- Avoid Sogginess: To prevent the apples from becoming soggy, store them without any added sauces or toppings. Add these just before serving.
- Maintain Texture: If the apples have a crispy topping, reheating in the oven as opposed to the microwave can help maintain their texture.
-
Storing Leftover Ingredients:
- Butter and Sugar Mixture: If you have leftover filling (like a butter and sugar mixture), store it in an airtight container in the refrigerator and use it within a week.
- Unused Apples: Store any unused apples in the refrigerator. Whole apples can last for several weeks, while sliced apples should be used within a few days.
-
Additional Tips:
- Label and Date: When freezing, always label and date the storage bags to keep track of the freshness.
- Serving After Storage: If the apples lose some of their visual appeal after storage, adding fresh toppings like a sprinkle of cinnamon or a drizzle of caramel sauce can enhance their presentation when serving.
By following these storage and preservation tips, you can enjoy oven-baked bloomin’ apples at their best, even after some time has passed.
Common Mistakes and Troubleshooting
-
Overcutting the Apples:
- Mistake: Cutting the apple slices too deep, causing them to fall apart.
- Solution: Cut slices only deep enough to allow the apple to open slightly. Leave about 1/4 inch at the bottom uncut.
-
Underbaking or Overbaking:
- Mistake: Underbaking leaves apples too firm, while overbaking makes them mushy.
- Solution: Bake until they are just tender. Use a fork to check for doneness, adjusting baking time as needed.
-
Apples Turning Brown:
- Mistake: Apples discolor after cutting due to oxidation.
- Solution: Brush cut apples with lemon juice or soak them in a mixture of water and lemon juice for a few minutes before baking.
-
Filling Overflowing or Not Sufficient:
- Mistake: Too much filling causes it to overflow, while too little makes the apples less flavorful.
- Solution: Use the right amount of filling, ensuring it’s evenly distributed. You can always serve extra filling on the side.
-
Apples Not Opening Properly:
- Mistake: Apples don’t fan out as expected.
- Solution: Make sure your cuts are deep enough and evenly spaced. Also, baking in a dish that snugly fits the apples helps them to open up.
-
Uneven Cooking:
- Mistake: Some parts of the apple may be overcooked while others are undercooked.
- Solution: Ensure even slicing and consistent oven temperature. Rotating the baking dish halfway through can also help.
-
Toppings Getting Burnt:
- Mistake: Toppings like nuts or oats burn in the oven.
- Solution: Add these toppings halfway through the baking process or cover the apples with foil if they start to burn.
-
Apples Losing Shape:
- Mistake: Apples become too soft and lose their form.
- Solution: Choose firmer apple varieties like Granny Smith or Honeycrisp and avoid overbaking.
-
Difficulty in Coring:
- Mistake: Difficulty in removing the apple core neatly.
- Solution: Use a sharp corer or a melon baller and ensure it’s centered to remove the core without affecting the apple’s shape.
-
Soggy Bottom:
- Mistake: The bottom of the apple becomes soggy.
- Solution: Bake apples in a muffin tin to hold them upright and ensure even cooking.
By being mindful of these common mistakes and knowing how to troubleshoot them, you can ensure your oven-baked bloomin’ apples turn out perfectly every time.
FAQs about Oven-Baked Bloomin’ Apples
What type of apples should I use?
Choose firm apples like Honeycrisp or Granny Smith for the best results, as they hold their shape well when baked.
How do I prevent the apples from browning?
Brushing the cut apples with lemon juice can help prevent browning.
Can I make these in advance?
Yes, you can prepare them a few hours in advance, but they are best served warm from the oven.
What fillings can I use?
Classic fillings include a mix of melted butter, cinnamon, and sugar. Nuts, caramel, or raisins are also great additions.
How long do I bake them?
Bake at 375°F (190°C) for about 25-30 minutes, or until the apples are tender.
Are Bloomin' Apples gluten-free?
Yes, if you use gluten-free ingredients in the filling, they can be gluten-free.
Conclusion
Oven-Baked Bloomin’ Apples are a simple yet elegant dessert that combines the comfort of baked apples with the charm of a blooming flower. Perfect for impressing guests or treating your family, they’re a versatile dessert that can be adapted to various tastes and occasions. Whether served as a warm dessert on a chilly evening or as a special treat, these bloomin’ apples are sure to be a delightful addition to any meal.
Print
- Total Time: 45 minutes
Description
I prepared these Oven-Baked Bloomin’ Apples ![]() , covered them generously with vanilla ice cream, and they turned out incredibly delicious!
, covered them generously with vanilla ice cream, and they turned out incredibly delicious!
Ingredients
- 4 large apples (Honeycrisp or Granny Smith work well)
- 1/4 cup unsalted butter, melted
- 1/4 cup brown sugar
- 1 teaspoon ground cinnamon
- 1/4 cup chopped pecans or walnuts (optional)
- Vanilla ice cream for serving
Instructions
- Preheat your oven to 375°F (190°C).
- Wash and core the apples, leaving the bottom intact. If necessary, slice a small portion off the bottom to create a stable base.
- In a small bowl, mix melted butter, brown sugar, and ground cinnamon until well combined.
- Place the cored apples in a baking dish.
- Spoon the cinnamon-sugar mixture evenly over each apple, making sure to get the mixture into the cored center.
- If desired, sprinkle chopped nuts over the top of each apple.
- Bake in the preheated oven for 25-30 minutes or until the apples are tender.
- Remove from the oven and let them cool slightly before serving.
- Serve the bloomin’ apples warm, preferably with a scoop of vanilla ice cream on the side.
Notes
- Serving Suggestion: Serve with a scoop of vanilla ice cream or a drizzle of caramel sauce for an extra indulgent dessert.
- Cutting Technique: Be careful not to cut all the way through the apple to ensure it fans out properly while baking.
- Core Removal: A melon baller is an excellent tool for easily removing the apple core.
- Adjusting Sweetness: You can adjust the amount of sugar based on the sweetness of the apples and your preference.
- Baking Dish: Use a baking dish that snugly fits the apples to help them hold their shape.
- Prep Time: 15 minutes
- Cook Time: 30 minutes